Cyber threats are evolving rapidly, so securing your website is not just an option but a necessity. You need to be aware of the latest strategies and tools to protect your online presence. This blog will provide comprehensive tips and strategies to secure your website effectively.
Table of Contents
- Understanding the Importance of Website Security
- Implementing HTTPS and SSL Certificates
- Regular Software Updates and Patching
- Using Strong Passwords and Multi-Factor Authentication (MFA)
- Implementing Web Application Firewalls (WAF)
- Regular Backups and Disaster Recovery Plans
- Monitoring and Logging
- Securing Your Website Code
- User Education and Awareness
1. The Importance of Website Security
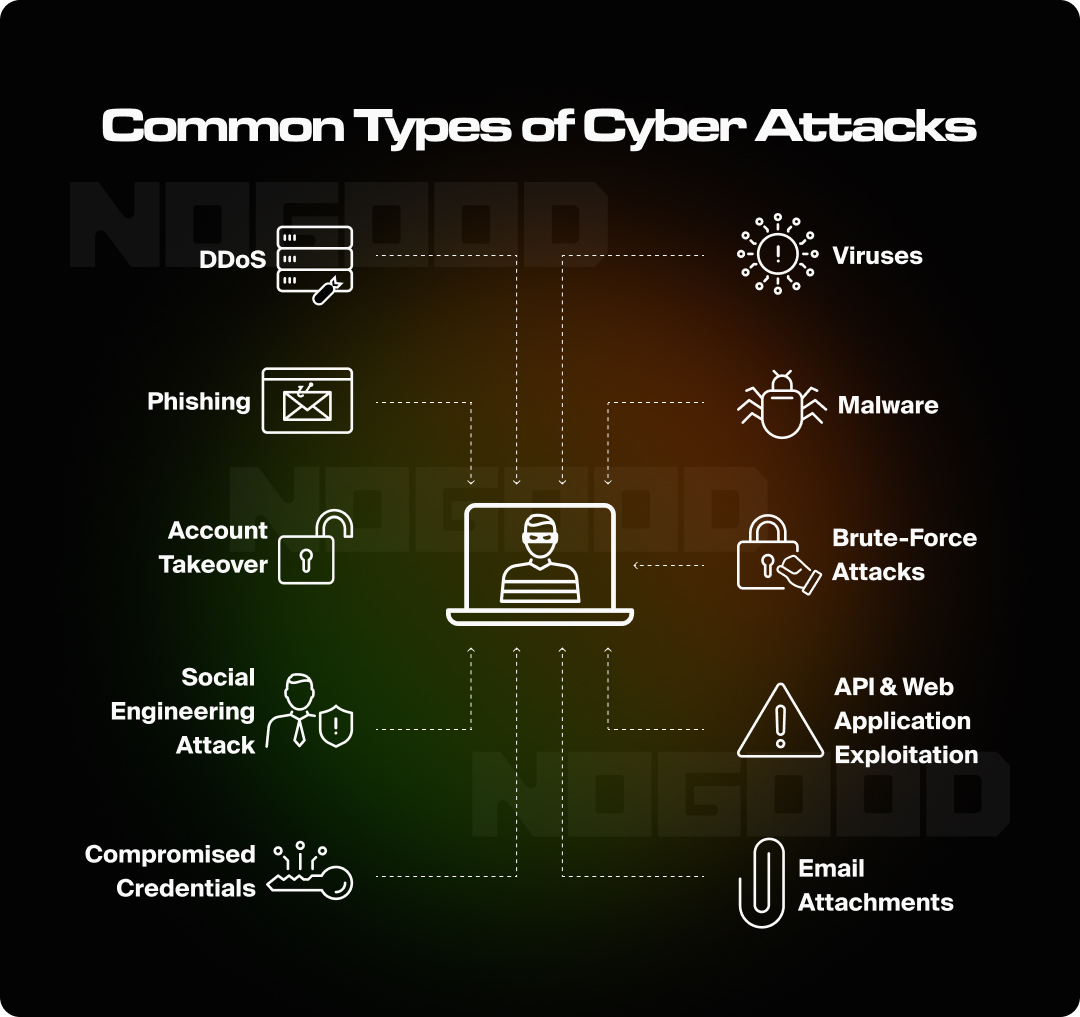
Website security involves protecting your website from various online threats and vulnerabilities. The importance of this topic cannot be overstated. A compromised website can lead to data breaches, loss of user trust, and financial loss. Examples of cyberattacks include:
- SQL Injection: SQL injection is a type of cyberattack where malicious code is injected into a website’s database query, allowing attackers to manipulate the database. For example, they might gain unauthorized access to sensitive information like user data or modify the website’s content. A successful SQL injection attack can compromise the entire database, exposing confidential information and potentially leading to severe data breaches.
- Cross-Site Scripting (XSS): XSS attacks involve injecting malicious scripts into a trusted website, which are then executed in the browser of unsuspecting users. This allows attackers to steal sensitive information like cookies, session tokens, or even login credentials. An XSS attack can lead to unauthorized access to user accounts or cause users to unwittingly execute harmful actions on the site.
- Distributed Denial of Service (DDoS): In a DDoS attack, a website is overwhelmed with a flood of traffic from multiple sources, rendering it slow or completely inaccessible to legitimate users. The attackers typically use botnets – networks of compromised devices – to launch these attacks, causing service disruptions and potentially harming a website’s reputation and business operations.
If you understand the importance of website security, you must realize that it’s not just about preventing unauthorized access, but also about maintaining the integrity and confidentiality of your data. A secure website helps protect sensitive information such as personal data, payment information, and proprietary content.
2. Implementing HTTPS and SSL Certificates
One of the most important steps you need to take is to implement HTTPS.
What is HTTPS?
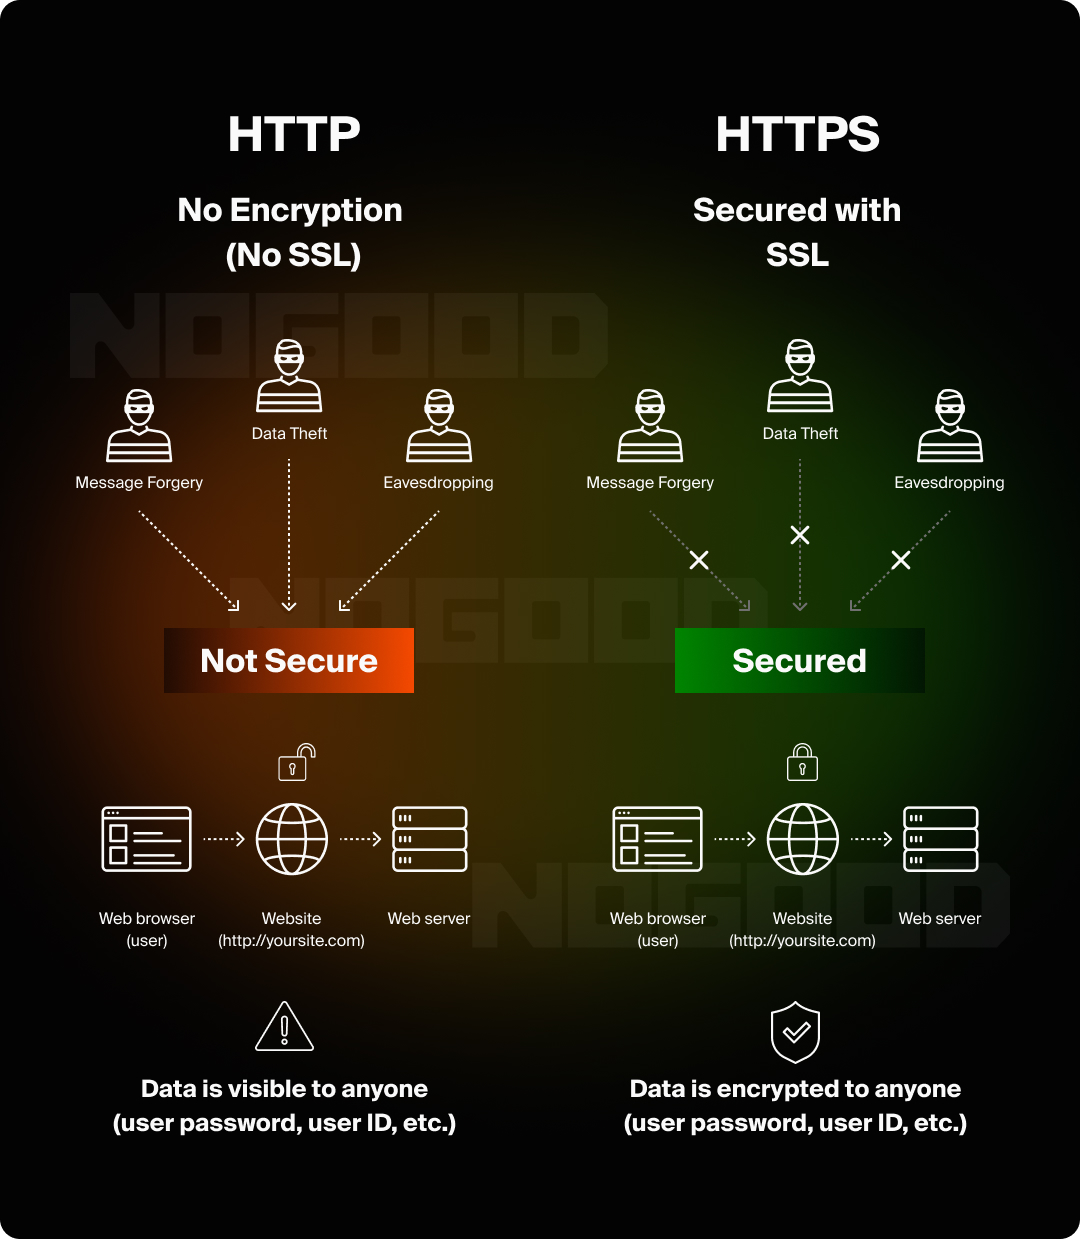
Hypertext Transfer Protocol Secure HTTPS is an extension of HTTP. This extension adds a layer of security by using SSL that encrypts the data transferred between the user’s browser and your server, ensuring that sensitive information, such as login credentials and payment details, remains confidential and protected from interception.
What is SSL and Why is It Important?
Secure Sockets Layer (SSL) certificates are essential for establishing a secure connection between the server and the website. They authenticate the identity of your website and encrypt the data exchanged between users and your server. Without SSL, your website is vulnerable to:
- Eavesdropping: Eavesdropping on a website refers to intercepting data as it travels between a user’s browser and the website’s server. This can happen when the website does not use encryption, like HTTPS, and transmits sensitive information in plain text. For instance, an attacker could “listen” to this communication and steal personal information, such as login credentials or credit card details, without the user knowing. To prevent this, websites need to implement strong encryption methods to secure all data exchanges.
- Data Manipulation: Data manipulation occurs when an attacker intercepts and alters data that is being transferred between a website and its users. This could involve modifying the contents of a form submission, changing transaction details, or even altering website content before it reaches users. From the website owner’s perspective, this could lead to corrupted databases, inaccurate user information, or unauthorized actions being carried out in the system.
How to Implement HTTPS
First, purchase an SSL certificate. You need to purchase the SSL certificate from a trusted Certificate Authority (CA) like:
Then, you will need to choose between:
- Domain Validated (DV): Basic encryption, only verifies domain ownership, fast and easy to obtain, no extra trust indicators. Ideal for personal or informational sites.
- Organization Validated (OV): Verifies both domain ownership and the organization’s legitimacy, offering moderate assurance. Best for businesses or sites requiring higher trust.
- Extended Validation (EV): Provides the highest level of validation, displaying the organization’s name in the browser for maximum trust. Best for websites dealing with financial transactions or sensitive data.
This choice will be based on your needs.
Now it’s time to install the SSL certificate. We’ll walk through an example of how to install the certificate on a WordPress website:
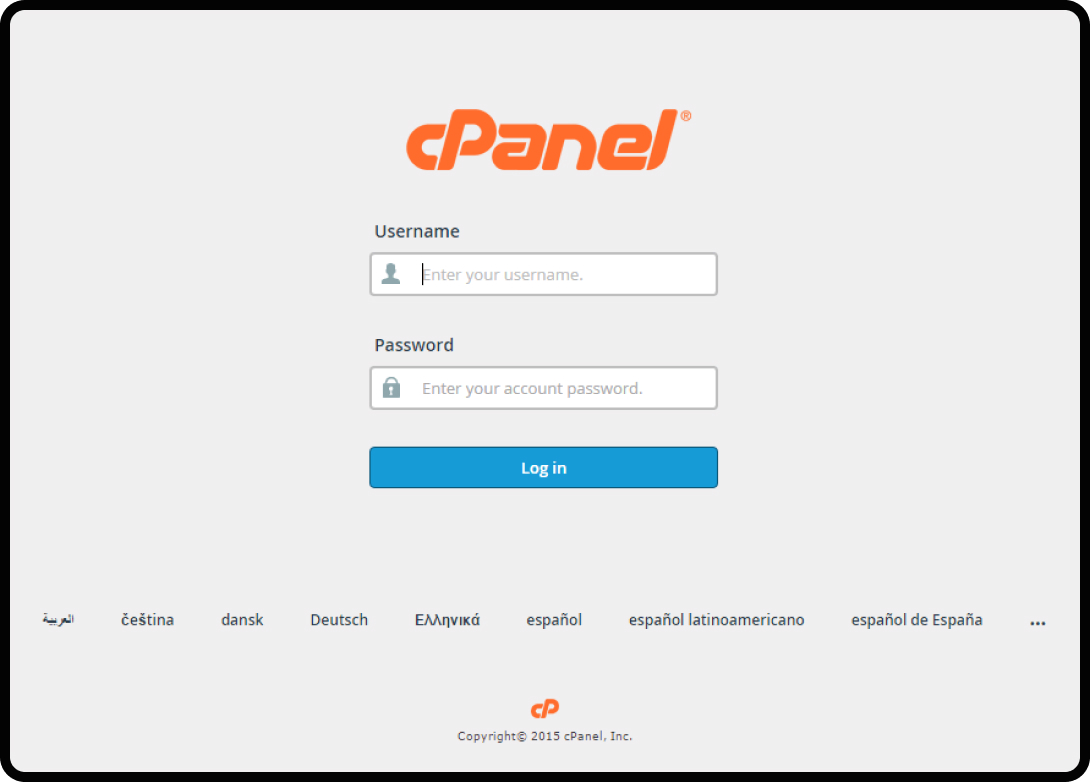
- After getting the SSL certificate from the provider, you need to access your Hosting control panel (cPanel).
- In the security section, locate the SSL/TLS section.
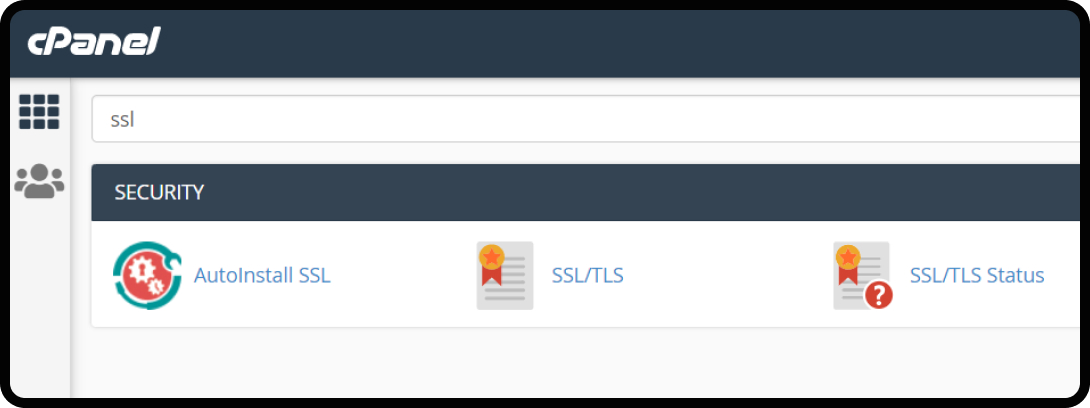
- Manage SSL Sites or Install and Manage SSL.
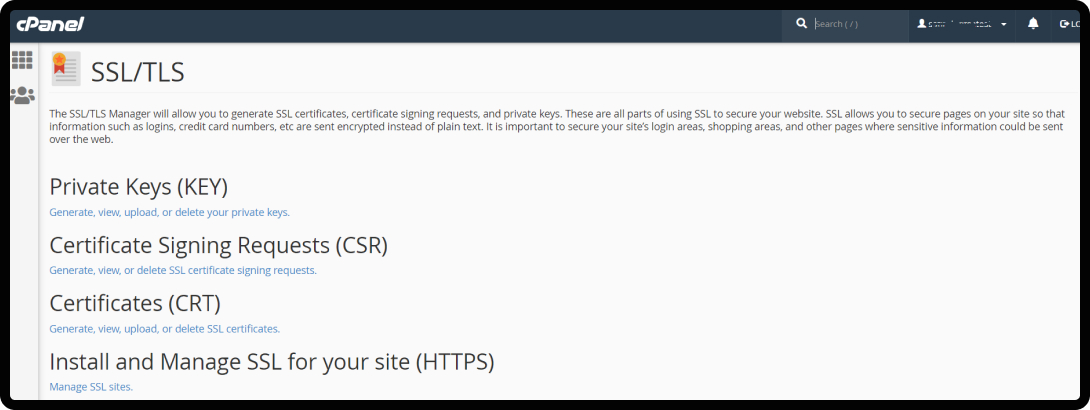
- Upload the files provided by your CA.
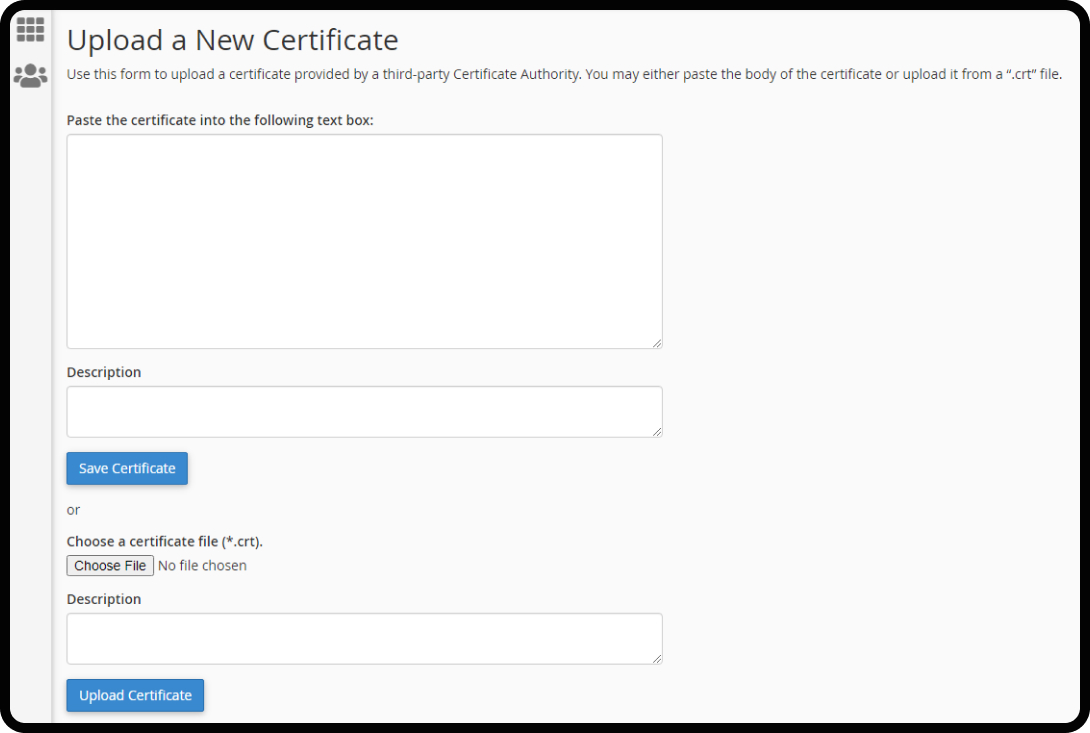
- Once the files are uploaded, click on “Install Certificate” or a similar button to activate the SSL certificate.
- Configure WordPress to use HTTPS by changing the URL in the WordPress settings from http:// to https://.
- Visit your website using https:// to confirm that the SSL certificate is working.
Setting Up a 301 Redirect
After installing your SSL certificate and confirming that it’s working, set up a 301 redirect to ensure all traffic is directed to the secure version of your site (from HTTP to HTTPS).
A 301 redirect is a permanent redirect that informs browsers and search engines that the requested URL has been permanently moved to a new location. When users or bots try to access the old URL, they’re automatically redirected to the new one. A 301 redirect is essential for several reasons:
- SEO Benefits: A 301 redirect passes nearly all the SEO authority from the original URL to the new one. This is crucial when moving from HTTP to HTTPS, as it preserves your site’s search rankings and avoids any drop in traffic.
- User Experience: Users who visit your old HTTP site will be automatically redirected to the secure HTTPS version, ensuring a seamless experience without them having to manually change the URL.
- Security: Redirecting all traffic to the HTTPS version ensures that visitors are always using a secure connection, which protects their data and helps build trust.
To install a 301 redirect:
- Open the file manager
- Search for .htaccess in public_html
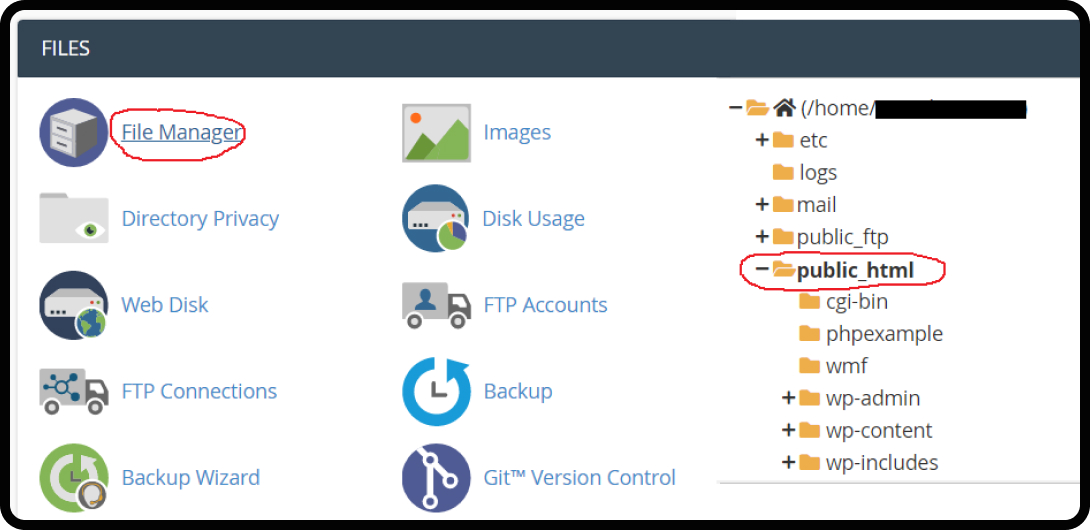
- Add the 301 Redirect Code.
Test Your HTTPS Implementation
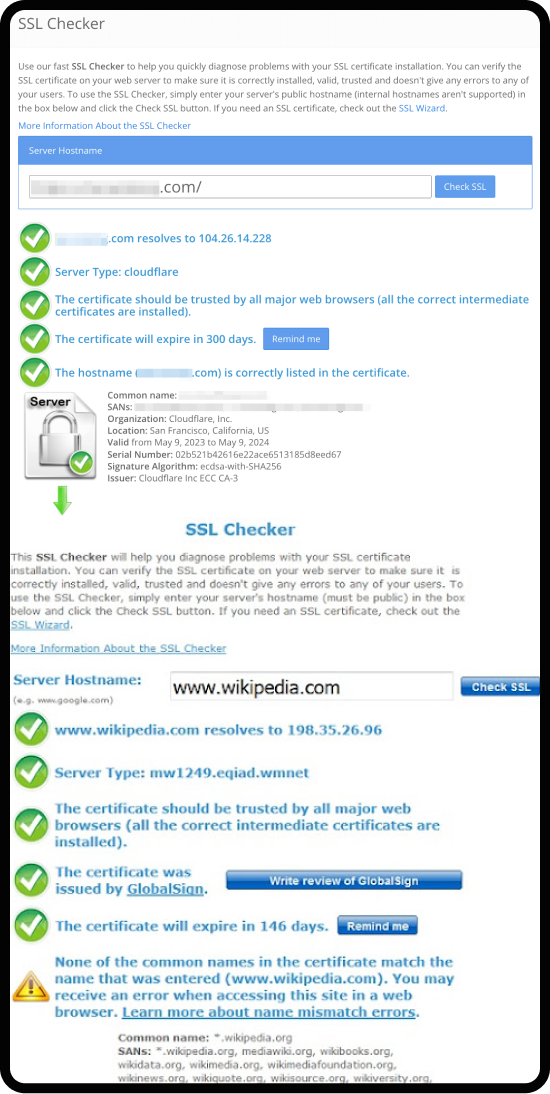
Use tools like SSL Labs’ SSL Test to verify that your SSL certificate is correctly installed and configured.
Here’s what it should look like if it’s been installed successfully vs. what it’ll look like if something’s gone wrong with the process::
3. Regular Software Updates and Patching
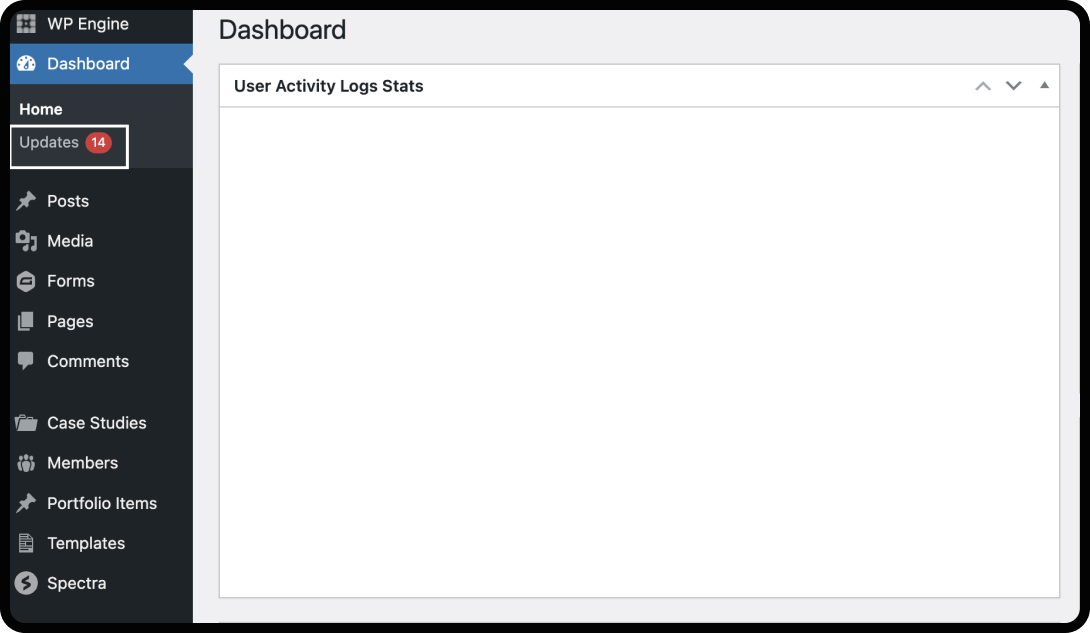
Keeping the software on your website up to date, including the server software, plugins, themes, and content management system (CMS), is one of the easiest and most effective security precautions.
Why Are Updates So Important?
Software developers regularly release updates to fix security vulnerabilities, patch bugs, and enhance functionality. Running outdated software leaves your website exposed to known exploits that hackers can easily take advantage of.
Best Practices for Software Maintenance
- Enable Automatic Updates: Many themes and plugins allow you to enable auto updates. This will ensure that updates are made when the new software is released.
- Check for Updates Regularly: You need to check your software regularly and update the plugins or the themes that don’t support auto-update or where you didn’t enable the auto-update for them.
- Subscribe to Security Bulletins: You need to be aware of the latest vulnerabilities and patches by subscribing to security bulletins from your CMS and plugin developers like:
- Test Updates in a Staging Environment: You need to test any update first on your staging environment to make sure that you don’t damage the production environment. If you don’t have a staging environment, you can create one. Here are some simple steps to follow to create a staging environment if you’re using WP Engine to host your WordPress site:
- Log in to your WP Engine user portal.
- Access your website dashboard – from the user portal dashboard, locate the website for which you want to create the staging environment and click on it to open the site’s details.
- Navigate to the staging environment – WP Engine typically provides three environments: Production, Staging, and Development.
- Select the Staging tab – if the staging environment is not yet set up, you’ll see an option to create one.
- Copy your live site to staging – choose the option to copy your live site to the staging environment. This will duplicate your live website, including its files and database, in the staging environment.
- Confirm the action when prompted.
- Wait for the process to complete – depending on the size of your website, this may take several minutes.
- Once completed, you’ll receive a notification.
- Access the staging site – WP Engine provides a unique URL for your staging environment, typically in the format staging-sitename.wpengine.com. Use this URL to access your staging site and verify that everything is working correctly.
- Make changes safely – use the staging environment to test updates, new plugins, themes, or design changes without affecting your live site.
- Deploy changes to your live site – once you’ve tested your changes in the staging environment, you can push them to the live site. To do this:
- Go back to the WP Engine User Portal.
- Select Staging > Copy to Live.
- Confirm that you want to overwrite the live site with the staging site content.
4. Using Strong Passwords and Multi-Factor Authentication (MFA)
Weak passwords are a significant security risk. You need to implement strong passwords, and the use of a password manager can significantly enhance security. Besides that, you need to implement Multi-Factor Authentication (MFA) to add an extra layer of protection by requiring a second form of verification.
Tips for Strong Passwords
- Use a mix of characters, including uppercase and lowercase letters, numbers, and special characters.
- Avoid common words and phrases that include easily guessable information like: “password” or “123456.” Instead, use a random combination of characters.
- Change passwords regularly. Updating passwords minimizes the risk of them being compromised over time.
Implementing Multi-Factor Authentication (MFA)
Multi-Factor Authentication (MFA) involves something the user knows (password), something the user has (a mobile device), and something the user is (biometric data).
Here’s how to implement MFA:
- Choose an MFA Method: Options include SMS codes, authentication apps (like Google Authenticator), or biometric verification.
- Enable MFA for All User Accounts: Ensure that MFA is activated for all administrative and user accounts to enhance overall security.
- Educate Users: Provide information on setting up and using MFA to ensure users can effectively utilize this security feature.
5. Implementing Web Application Firewalls (WAFs)
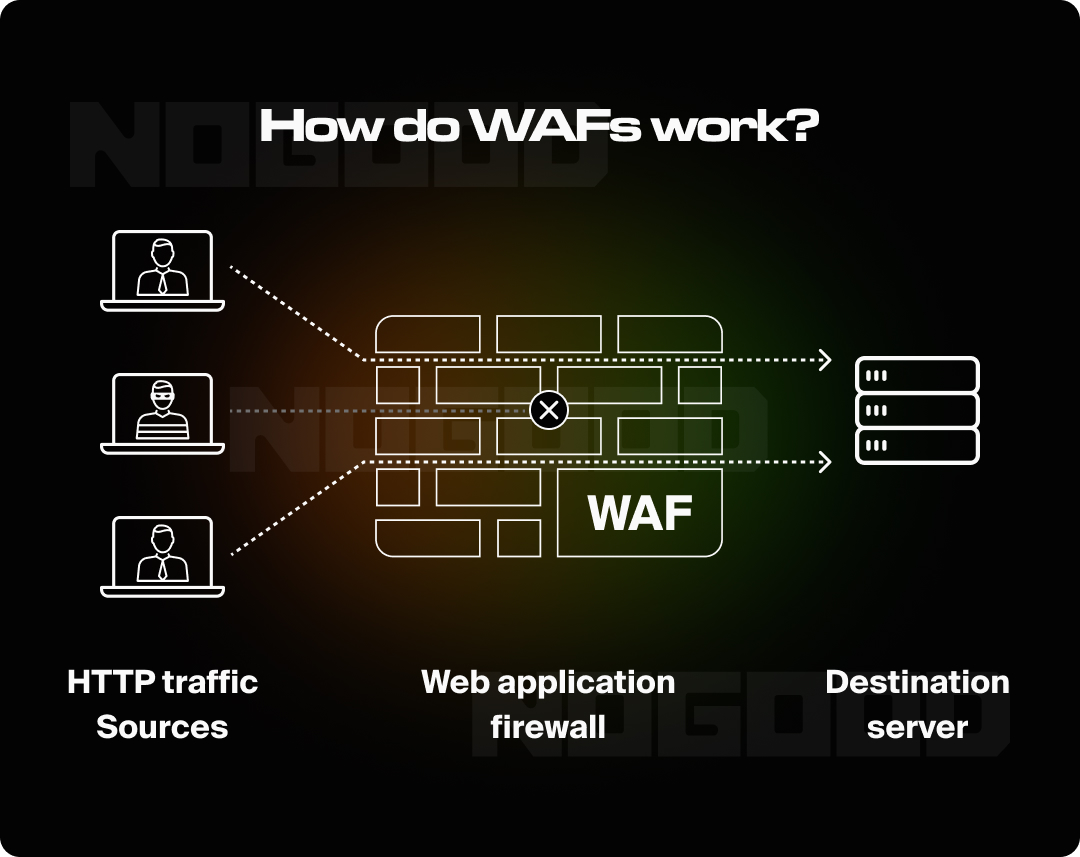
Web application firewalls are like a barrier between your website and potential attackers. They filter and monitor HTTP traffic and can block malicious activity, such as SQL injections and cross-site scripting (XSS) attacks.
Some of the benefits of implementing WAF include:
- Protecting against SQL injection, cross-site scripting (XSS), and other attacks
- Providing real-time monitoring and alerts
- Being configured to suit specific security needs
How to Choose and Implement a WAF
- Evaluate WAF Providers: Choose a reputable WAF provider that offers comprehensive protection like threat detection and mitigation, traffic filtering, data encryption, content delivery network (CDN) integration, and real-time monitoring and alerts. Some trusted providers include:
- Configure WAF Rules: Customize the firewall rules to address potential threats and vulnerabilities specific to your website.
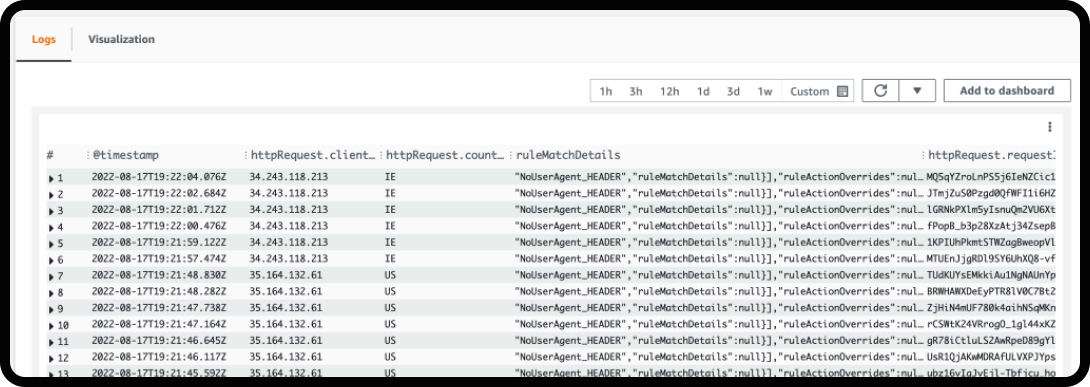
- Monitor and Adjust: Regularly review WAF logs and adjust rules as needed to enhance protection and address new threats.
6. Regular Backups and Disaster Recovery Plans
You need to regularly create a backup, because breaches can still occur despite all precautions. Regular backups and a solid disaster recovery plan are essential to minimize damage and recover quickly because they ensure that you can restore your website to a previous state in the event of a security breach, data corruption, or hardware failure. Without backups, you risk losing valuable data and experiencing prolonged downtime.
Some essential strategies for backing up your website:
- Schedule automatic backups to run at regular intervals.
- Store backups in multiple locations. You can choose between cloud storage and physical devices. This redundancy protects against data loss.
- Test your backups on a staging environment or the local host to make sure you can successfully restore any of them at any time. This helps avoid surprises during a disaster recovery situation.
How to Create a Disaster Recovery Plan
- Document Recovery Procedures: Develop a detailed plan outlining the steps to take in case of a disaster, including how to restore data and recover from attacks.
- Assign Roles and Responsibilities: Designate team members responsible for executing the disaster recovery plan and ensure they are trained and prepared.
- Review and Update the Plan: Regularly review and update your disaster recovery plan to account for changes in your website and security landscape.
Here’s an example of the tactical steps taken in a disaster recovery plan:
- Assess the situation
- Contain the damage
- Restore backups
- Test the restored website
- Address the root cause
- Go live
7. Monitoring and Logging
Monitor and log your website activities continuously to help detect and respond to suspicious activities quickly. Implementing a robust monitoring system can provide insights into potential security incidents.
Here are some tools that can help you monitor website activity:
- Intrusion Detection Systems (IDS): these tools monitor network traffic and alert you to suspicious activities that may indicate an attack. Some IDS tools you can use include:
- Snort: An open-source network-based IDS capable of real-time traffic analysis and packet logging. It’s widely used, regularly updated, and has flexible deployment options. It does, however, require manual configuration and can generate false positives if not properly configured.
- Suricata: An open-source IDS/IPS engine offering high-performance network monitoring and security capabilities. It’s multi-threaded, offering better performance on modern hardware, and it supports advanced features like file extraction and TLS certificate logging. It’s also compatible with Snort. However, it can have a steeper learning curve, and it may require robust hardware.
- Security Information and Event Management (SIEM) Systems: SIEM systems collect and analyze security data from various sources, providing a comprehensive view of your security posture.
- Real-Time Alerting and Reporting: Configure alerts for critical events, such as unauthorized access attempts or configuration changes, to enable swift responses.
When logging your website activity, make sure to follow these best practices:
- Enable Comprehensive Logging: Ensure that all relevant events, such as login attempts, file changes, and error messages, are logged.
- Secure Log Storage: Protect log files from tampering and unauthorized access by storing them in secure locations with restricted access.
- Regularly Review Logs: Regularly review logs to identify any unusual or suspicious activities that may require investigation.
8. Securing Your Website Code
Your website code can contain vulnerabilities, and this can be exploited by attackers to gain unauthorized access, steal data, or cause other damage. Secure coding practices and regular code reviews can help to stop attackers.
Secure Coding Practices
Validation & Sanitization
First, you should validate and sanitize user inputs. Validation refers to the process of ensuring that user input meets specific criteria before it’s accepted and processed. This usually involves checking:
- Format: the data follows a specific structure (e.g. email address, phone number, etc.)
- Type: the data is the expected type (e.g. integer, string, etc.)
- Length: the maximum and minimum length of the data
- Range: for numerical data, that it’s within a certain range
- Whitelist/Blacklist: only permitted characters or patterns are allowed
Sanitization refers to cleaning the user input by removing potentially harmful characters. This ensures that even if a user puts in malicious information or data, it will not be executed or processed in ways that are harmful to your site.
Validation rejects invalid output at the jump, while sanitization transforms potentially malicious input into safe input.
Using Parameterized Queries
Using parameterized queries helps protect against SQL injections. Here are some steps to start using parameterized queries:
- Prepare the SQL Statement: use placeholders (?, :name, etc.) instead of directly concatenating user inputs.
- Bind Parameters: bind user inputs securely to the placeholders.
- Execute the Query: use the database library’s methods to safely execute the query with the bound parameters.
Regularly Review Code
Conduct regular code reviews and audits to identify and address security issues early in the development process.
9. User Education and Awareness
You need to educate your users about the latest and best practices in website security. Informing users about phishing scams, safe browsing habits, and secure password practices can reduce the risk of security breaches.
Make sure to provide clear instructions and guidelines on secure practices, such as creating strong passwords, or recognizing phishing attempts. For example, here are some actionable guidelines you could provide to users when it comes to recognizing and avoiding phishing attempts:
- Check the Sender’s Email Address: look for subtle misspellings or variations. For example, might appear as . It’s also important to look beyond the display name. An email may show “PayPal Support,” but it could come from a fraudulent address.
- Inspect Links Before Clicking: hover over a link to reveal the true destination URL. Avoid clicking on it if it looks suspicious, contains typos, or points to an unexpected domain. For example, a link leading to paypa.secure-login.com instead of paypal.com. Be especially wary of shortened URLs.
- Identify Urgent or Threatening Language: phishing emails often create a false sense of urgency. Phrases like “Your account will be locked in 24 hours!” or “Unauthorized login detected!” are red flags meant to prompt rash actions.
- Beware of Requests for Sensitive Information: legitimate organizations rarely ask for sensitive data via email. Examples include passwords, credit card details, or Social Security Numbers. Always verify requests through official channels.
- Verify the Legitimacy of the Email: Contact the company directly using their official website or support number.Avoid using phone numbers or links provided in the suspicious email.
You can also educate your users by using pop-up tips or notifications on your website or app to remind them of security protocols and best practices, especially if you deal with sensitive information like personal or financial data.
Take Your Website Security Seriously
Securing your website requires a multi-faceted approach. You may greatly lower the risk of cyber risks by putting HTTPS into place, updating software, using MFA and strong passwords, utilizing WAFs, storing up data, keeping an eye on activity, securing code, and educating users. Recall that maintaining cybersecurity requires constant attention to detail as well as adjustment to new threats and technological advancements.
Through adherence to these tactics and continuous learning about emerging security paradigms, you may safeguard your website against any intrusions and guarantee a secure and safe browsing experience for your visitors.


Brilliant effort keep going mate ❤️